Tuesday, 17 November 2015

Rokinon/Samyang 12 mm f2 wide angle lens

I had been procrastinating over whether or not to buy this lens for a long while and eventually took the plunge after a more than usually lucrative sale of a photograph. My initial impression was very favourable, it's a manual focus lens, beautifully constructed, and it focuses readily using the EVF on the NEX 6.  Images have plenty of bite being contrasty and sharp in the centre, but not quite so hot at the edges.

It does focus beyond infinity, so you do need to check the focus in your viewfinder rather than rely on the scale.

I'm still not 100% convinced that the lens is quite right and have been carrying out a few tests to see what it is capable of. Here's a few results (click for enlarged views) : -

1) The traditional brick wall text. This is a series of 100% crops from a rather uninteresting brick wall shot.


There's a bit of distortion, but for an 18mm equivalent lens, it's not bad. The right hand side is not quite as sharp as the left, and there is a fall off from the centre at both f2 and f8. The centre is impressive at f2!

2) A challenging side lit scenic shot


The river at Durham


Two sections from the above view. That on the left shows flare occurring due to  the strong sidelight, sun just out of shot. The right hand sample is from the top right corner of the frame and is creditably sharp ( I wish that my Sigma 19mm f2.8 was as good at the edges!).

3) Chromatic Aberration - Always going to be a problem with a lens as wide as this one, but most instances largely fixable in Lightroom.  Extreme cases might need additional cloning work in Photoshop. 


Showing CA top right corner


After treatment in Lightroom

In this instance the one click solution did not provide a sufficient cure, but a touch on the defringe slider took care of the situation.

LR 6.4 includes Rokinon lens profiles but they don't appear to correct CA. They do make a pretty good job of fixing distortion and vignetting however.


A bit of fun, the interior of the Scottish National Gallery, an HDR rendering courtesy of LR.


Conclusion - pros and cons, but pretty good overall!

For guidance on using manual focus lenses on the Sony look here


Sony NEX 6 Rokinon 12 mm f2

Last edit 30-1-16


Durham Lumiere 2015

I went on the last day of operation, on Sunday evening. Unfortunately the Whale exhibit had been shut down due to high water levels in the river, but the rain did hold off for most of the time. On previous occasions I have taken a tripod, but, knowing the density of the crowds, this time I decided against it.

Click photos for larger views.


Sony NEX 6 various lenses.

Saturday, 12 September 2015

Perspective Correction Part 2

In an earlier epistle I listed a number of methods for shooting tall buildings and reducing or eliminating converging verticals. I listed the technique of stacking several images but noted that I had not tried this method.

Well I have now given it a go and have been reasonably impressed with the outcome, see for yourself below.


This is the Emerson Chambers building in Newcastle upon Tyne, situated at the head of Grey Street and currently occupied by Waterstones bookshop. 

I used a Sony NEX 6 camera fitted with the standard Sony 16-50 zoom lens at about 28mm focal length ( 42 mm equivalent full frame). The combined photo used 5 shots, starting at the base working upwards with a healthy overlap between them. 

The images were developed in Lightroom, with the only adjustment being a standard lens profile correction.

The developed images were transferred to Photoshop (CS4) as 16 bit TIFF files, and two different methods of combining them were tried.

1) The easiest way to do this is to use the File Automate Photomerge command, selecting all of the currently open images. This did a job. The main building was not too bad but there was some weird colouration in the sky while the buildings to the rear right were well distorted.

2) The next method is a tad more complex, but produced a better result.

I selected and copied all of the images over to the base layer (the bottom of the building) so as to obtain a layer stack of images. I then selected all of the layers and used the Layer Align command, followed by the Merge Layer command.

The resulting image was a great improvement on that produced by method 1, but there was still some distortion of the buildings to the rear right, and  a little chromatic aberration along a couple of edges. 

Some Photoshop skulduggery was able to sort all that out to produce a final photo that is 6616 x 4628 pixels in size. Printing at 300 dots per inch would result in  finished dimensions of about 22 x 15.5 ", but the quality of the original and, taking into account a sensible viewing distance, would allow a much larger reproduction were it required.

Edit - I've played around with this technique rather more now and have found that the degree of perspective correction appears to be related to the geometry of the base level shot. If your camera is completely level as you take the first shot, the software tries to mimic that geometry as it adds the layers above. While this may sound a good thing, an image without any trace of convergence of the verticals looks a tad strange, while the top layer has to be contorted rather more than might be considered comfortable in order to comply. I guess that I'm still in the experimental stage, but I am beginning to prefer a base level shot that is just off the horizontal, so that the resulting image has some degree of natural perspective after assembling all of the layers.

I've also tried the automatic panorama feature in Lightroom 6 (Right click, Photomerge), which is surely the quickest software fix for this problem, but I have not been as impressed with the results as with those that I have achieved using my venerable copy of Photoshop.

Last edit 25-2-2016


Sunday, 6 September 2015

Wildflower seeds September


Rose hips


Rosebay Willowherb


Rosebay Willowherb


Creeping Thistle

I went for a walk this morning - beautiful sunshine here in the North east - and the seeds of wildflowers caught my eye. Rosebay Willowherb and Creeping Thistle are both a complete nuisance in the garden, but, in a more natural environment, they do look rather nice!

Sony Nex 6 Pentax 35mm lens

Sunday, 23 August 2015

Managing Perspective

If you point your lens upwards, to capture all of a tall building for example, the resulting image will have sides sloping inwards looking towards a vanishing point in the sky. This subject was recently discussed on the Alamy (stock photography) web site where various "solutions" were considered. Perspective is a natural thing, railway lines appear to converge in the distance etc, but our mind knows that buildings should be vertical, and wants them to look that way, or almost that way.

Four solutions were proposed: -

1) Using perspective correction tools incorporated within image processing software, Lightroom, Photoshop etc. They work but there is some degradation of the image at the sides. This is my normal approach.

2) Using a shift lens - very expensive. Perhaps only for very wealthy amateurs or those pros who regularly get commissions to shoot architecture. Probably better than (1) above but still some potential degradation problems due to using a  lens very near to the edge of its image circle.

3) Shoot a rising stack of images and combine as a vertical panorama using the tools within Photoshop. Not tried this, but it sounds very interesting.

4) There are some third party software solutions which will take a completed image and attempt to improve the perpective. One such program is ShiftN and it's freeware. Intrigued I decided to give it a go and here is one result.


Without correction


With correction

This is using the automatic fix provided by the software - I've not yet dabbled with the various adjustments that are available.

The photo shows Appalachian dance group Step This Way performing at Durham County Cricket Club's Chester-le-Street ground.

I've now used this software on a number of photos, and the results vary from very impressive to distinctly weird. It's not a one stop shop solution, although, in fairness I've not experimented with the adjustments that are available. It's certainly worth having in your toolbox and you can decide in each case whether or not its application is appropriate.

Monday, 25 May 2015

Problems with Sigma 19mm f2.8 lens

I have the earlier version of the Sigma 19mm f2.8 E fit lens for Sony. It's the only auto focus lens that I regularly use and, for the price ( I paid about £100), it does a good enough job.

Experience in long term use has thrown up a few problems.

The first is annoying rather than optically limiting. This is a budget lens and it feels it, the lens hood and rear cap are not a tight fit and irritatingly fall off. I've tried wedging a piece of loo paper between the hood and lens but that's not a good solution. I've thought of super-gluing the hood into place, but one day I might want to sell the lens and that would never do.

Very occasionally the lens fails to respond to the helm, it won't focus. Removing and replacing it has to date cured this issue, but long term, who knows? Maybe the contacts just need cleaning?

Occasionally the auto focus fails to hit the target. I've noticed this in particular when shooting a panorama, when three of the shots are sharp and one slightly out, but bad enough to be unusable. I don't know if this is a fault of the lens, or the camera, or the combination! This is the only auto focus lens that I use frequently, and maybe it's my technique at fault, but with centre point focus there's not much to get wrong. I guess that this confirms my view, that for static subjects, you can't beat manual focus.

But that brings me to another issue, I find this lens difficult to manually focus. I did think that this may be due to the relatively short  focal length compared to my older heritage glass, but I also possess a 12mm Rokinon, and that is better than the Sigma 19 mm in this respect. The image just doesn't seem to shout "in focus" as I look through the EVF in magnified view.

Then there is the business of the aperture setting. I normally use non Sony manual focus lenses that have an aperture ring. The Sigma, following normal convention for modern auto focus lenses, does not. I don't have too much of a problem with this, but what I do object to is the tendency of the camera lens combination to default to wide open, i.e. f2.8, when first attached. I've lost shots due to this in the past. I can't say that I have carried out any systematic tests, and I'm not sure if this is actually the default setting or just some random fault, but it occurs frequently enough to give me grief. I've used auto focus Sigma lenses on Canon cameras and I can't say that I've noticed this happening with that combination.

If I use my elderly 50mm f1.8 Zuiko lens, or even my old Pentax 75-150 f4 zoom, I know that, provided I get the focus right, the resulting image will be sharp from corner to corner. It's a comforting thought, I like it that way. The Sigma 19 mm falls some way short of this ideal. It normally provides crisp detail in the centre of the image, but the edges are another story. OK edge detail is rarely critical, and maybe it's the nerd in me, but this irks me.

Recently I took some shots inside an old factory that was side lit via large windows. The Sigma lens couldn't handle the strong side light, whereas my ancient Pentax 28mm f3,5 K glass was not fazed at all. OK we are comparing a 19 mm and a 28 mm lens here and the problem is probably more severe for the wider lens. Here are a couple of images to demonstrate the problem.

Left click to see an enlarged view. Compare the two.


Pentax 28mm f3.5 K


Sigma 19mm F2.8 Sony E fit

I continue to use the Sigma lens, it retains its place in my kit, but I could not use the shot above.

I've taken loads of photos with the Sigma, and other than some focusing or depth of field issues ( I much prefer manual focus as I know exactly where the point of focus is) I generally get commercially acceptable results. This lowered contrast or flare problem  has only come to light in this one situation to date, but it's a definite limitation.

Remember that I have the early version of this lens, if you buy new today you will be getting a different and, hopefully, better product.

Sony NEX 6

Edited 10-01-2017


Cragside early May 2015

Cragside is my favourite National Trust property, the Rothbury based estate and house developed by the Victorian industrialist Lord Armstrong. We normally try to get to Cragside at the end of May or the beginning of June when the azaleas and rhododendrons are at their best, but this year we are off on our hols at the end of May, so we decided to take an earlier visit.

There were a few small azaleas in bloom, but nothing like the show that you can expect later in the year, however a surprise bonus was the display of tulips in the formal garden next to the glasshouses.


Inside the house we noticed the William Morris designed ceramic tiles


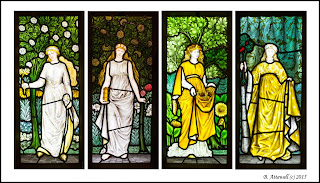
and the Four Seasons stained glass at either side of the fireplace.


The panels were originally back lit by daylight, but further building construction cut off that source of light. They are therefore illuminated electrically, not quite as evenly as would have originally been the case.

Sony NEX 6 Various manual focus lenses.